Allocation Plan Defined lets the user create the Allocation Plan Defined Lines manually or with the system's assistance.
To add items to the Allocation Plan Defined Lines manually
- Navigate to LS Retail - Replenishment - Manual - Allocation Plans.
- Open an existing Allocation Plan Defined or create a new plan. For more information refer to How to: Create an Allocation Plan Defined.
- In the Allocation Plan Defined Lines FastTab, select an Item No. Select also a valid Variant Dimension 1 Code if this is an item with variants. Then the Item Description, Allocation Rule Code, No. of Groups, No. of Destinations, Dimension Pattern Code and No. of Dimensions fields will be populated automatically based on the default settings of the selected Item No. and Variant Dimension 1 Code.
- Enter the Group <n> Quantity, and the Buffer Qty. and Total Quantity will be updated automatically.
-
Change the quantities as needed. For more information refer to How to: Adjust Quantities in the Allocation Plan Defined.
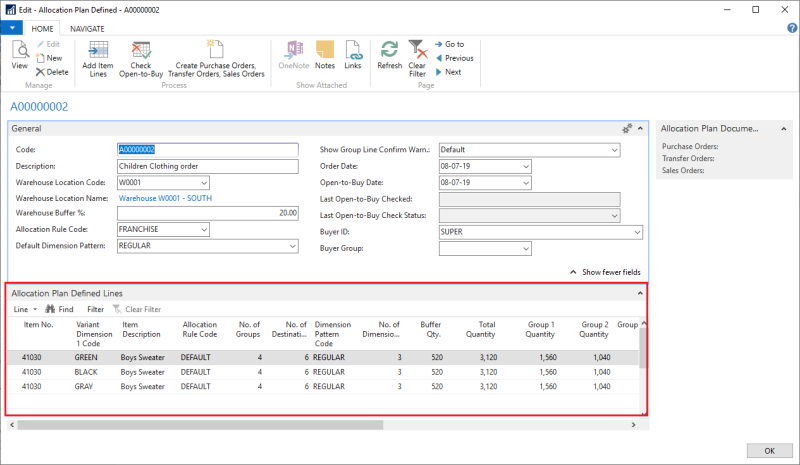
Fields in the Allocation Plan Defined Lines FastTab:
| Field | Description |
|---|---|
| Item No. | This field is the Item No. |
| Variant Dimension 1 Code | This field is only filled for items with a Variant Framework. If the lines were calculated by the Add Item Lines action, a separate line would be created for every Variant Dimension 1 Code. |
| Item Description | This field shows the description of the item. |
| Allocation Rule Code | This field is the currently active Allocation Rule that is applied for this line. The Allocation Rule Code is inherited from the Allocation Rule Code in the General FastTab. If the item has an Allocation Rule set up in the Allocation Rule Links, this value will be considered. You can change the Allocation Rule in the Allocation Plan Defined Lines. |
| No. of Groups |
This field shows the number of Store Groups or Customer Groups which require items. This is accessed from the selected Allocation Rule. |
| No. of Destinations | This field shows the number of Locations or Customers which require items. This is accessed from the selected Allocation Rule. |
| Dimension Pattern Code |
This field is the currently active Dimension Pattern that is applied for this line. The Dimension Pattern Code is inherited from the Default Dimension Pattern in the General FastTab. If the item has a Dimension Pattern set up in the Item Dimension Pattern Link or Item Distribution, this value will be considered. You can change the Dimension Pattern in the Allocation Plan Defined Lines. |
| No. of Dimensions | This field shows the number of Dimensions which are used to define the quantity needed. This field is only used for items with a Variant Framework. This is accessed from the item's Variant Framework. |
| Buffer Qty. |
This field specifies the buffer stock you would like to purchase additionally and keep in the selected warehouse. This is how it is calculated: Buffer Qty. = Total of all Group Quantity * (Warehouse Buffer % / 100) |
| Total Quantity | This field shows the sum of all Group Quantity and Buffer Qty.. |
| Group 1 Quantity | This field shows the quantity defined for the first group. |
| Group 2 Quantity | This field shows the quantity defined for the second group. |
| Group <n> Quantity | This field shows the quantity defined for the <n>-th group. |
| Create Documents | This field specifies if the Allocation Plan Defined Lines should be considered in the Create Purchase Orders, Transfer Orders, Sales Orders action. Note: Whenever the documents are created successfully, the value of this field will be set to FALSE. |
| No. of PO Lines Created | This field shows the number of lines created in Purchase Orders. |
| No. of TO Lines Created | This field shows the number of lines created in Transfer Orders. |
| No. of SO Lines Created | This field shows the number of lines created in Sales Orders. |
Note: Only the first six groups are displayed as individual columns. To access more groups you can drill down the No. of Groups field or make use of the Group Lines option in the Line menu.
To add items to the Allocation Plan Defined Lines with the Add Item Lines function
- Navigate to LS Retail - Replenishment - Manual - Allocation Plans.
- Open an existing Allocation Plan Defined or create a new plan. For more information refer to How to: Create an Allocation Plan Defined.
- In the Allocation Plan Defined page, navigate to the Home action menu and click Add Item Lines.

- A request page will be displayed and you can define the items that need to be included in Allocation Plan Defined Lines using the available items' filters.
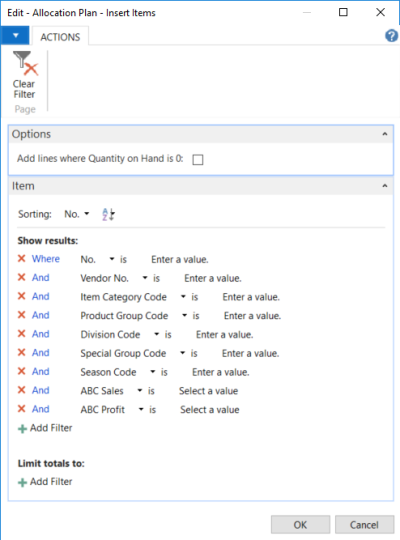
- Click OK. The system adds the items that meet the selected conditions to the worksheet.
- Enter Group <n> Quantity.
- Change the quantities as needed. For more information refer to How to: Adjust Quantities in the Allocation Plan Defined.
Note: The Add lines where Quantity on Hand is 0 field is only applicable to Buyer's Push.
Example 1: To allocate item without variant


- The user would like to purchase Appointment Diary by using Allocation Rule Code DEFAULT.
- There are 2 Store Groups defined in the Allocation Rule: SUPERMARK with 3 stores and FASHION with 2 stores.
- Stores in SUPERMARK would need 30 units each and stores in FASHION would need 20 units each, which make a total demand of 130 units.
- The Warehouse Buffer % is 10 (130 units x 10% = 13 units).
- A total of 143 units of Appointment Diary will be purchased inclusive of 13 units of buffer stock.
Example 2: To allocate item with variants

- The user would like to purchase Down Jacket Davi-s Casual Wear by using Allocation Rule Code DEFAULT.
- There are 2 Store Groups defined in the Allocation Rule: SUPERMARK with 3 stores and FASHION with 2 stores.
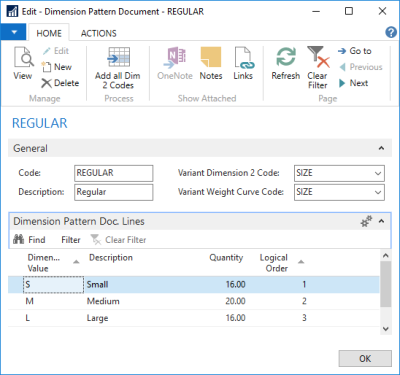
- Down Jacket Davi-s Casual Wear comes in 3 sizes: S, M, and L, the Dimension Pattern Code REGULAR will be used to define its distribution pattern.
- When 30 is entered into Group 1 Quantity (SUPERMARK), the calculated result would be as follows:
- According to the Dimension Pattern, size S, M, and L would need 16, 20, and 16 units respectively, and when this pattern is multiplied by 30, we will have a total of 1,560 units (size S: 16 x 30 = 480, size M: 20 x 30 = 600, size L: 16 x 30 = 480) for a single store.
- In total, the store group SUPERMARK would need 4,680 units (1,560 x 3 stores).
- When 20 is entered into Group 2 Quantity (FASHION), the calculated result would be as follows:
- According to the Dimension Pattern, size S, M, and L would need 16, 20, and 16 units respectively, and when this pattern is multiplied by 20, we will have a total of 1,040 units (size S: 16 x 20 = 320, size M: 20 x 20 = 400, size L: 16 x 20 = 320) for a single store.
- In total, the store group FASHION would need 2,080 units (1,040 x 2 stores).
- The Warehouse Buffer % is 10 (6760 units x 10% = 676 units).
- A total of 7436 units of Down Jacket Davi-s Casual Wear will be purchased inclusive of 676 units of buffer stock.
Note: To open the Dimension Pattern Document page, you can navigate to the Allocation Plan Defined Lines, and click the Line menu, then select Dimension Pattern Document.
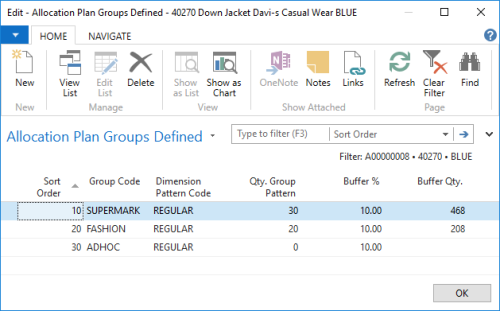
To see the allocation result on Group Line level
- Navigate to Allocation Plan Defined Lines, and click the Line menu.
-
Select Group Lines to open the Allocation Plan Groups Defined page.
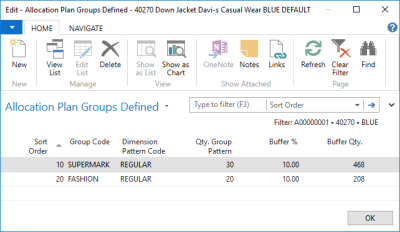
The Allocation Plan Groups Defined page shows the Destination Groups which are applied to the Allocation Plan Defined Lines according to the selected Allocation Rule. You can change the Qty. Group Pattern and Buffer % for each individual group.
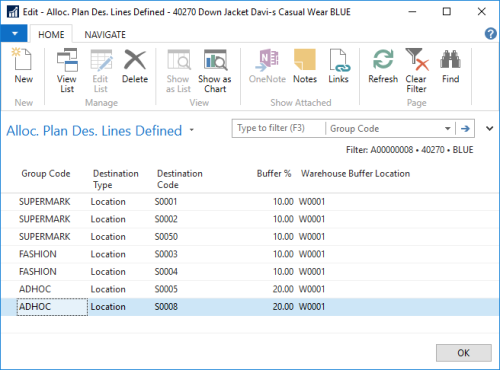
To see the allocation result on Destination Line level
- Navigate to Allocation Plan Defined Lines, and click the Line menu.
- Select Destination Lines to open the Alloc. Plan Des. Lines Defined page.
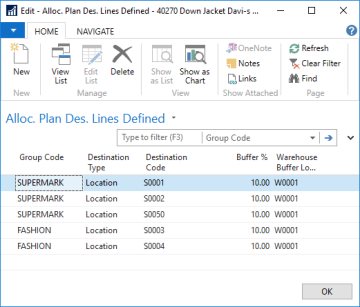
The Alloc. Plan Des. Lines Defined page shows the Destinations which are applied to the Allocation Plan Defined Lines according to the selected Allocation Rule. You can change the Buffer % for each destination.
Note: The new Buffer % value will only be considered in the next input of Group <n> Quantity.
To see the allocation result on Variant Line level
- Navigate to Allocation Plan Defined Lines, and click the Line menu.
- Select Variant Lines to open the Alloc. Plan Dim Value Defined page.
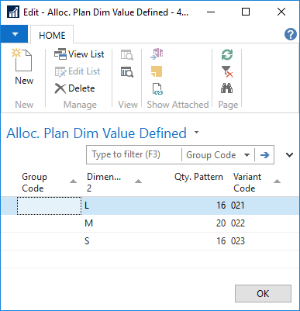
The Alloc. Plan Dim Value Defined page shows the variants which are applied to the Allocation Plan Defined Lines. You can change the Qty. Pattern for each individual dimension.
Note: The new Qty. Pattern value will only be considered in the next input of Group <n> Quantity.
To see the allocation result on Location Line level
- Navigate to Allocation Plan Defined Lines, and click the Line menu.
- Select Location Lines to open the Alloc. Plan Loc. Lines Defined page.
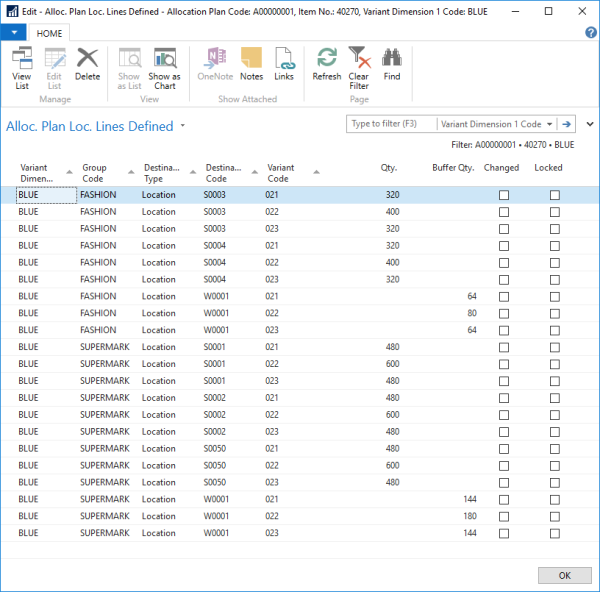
The Alloc. Plan Loc. Lines Defined page shows the locations (or customers) which are applied to the Allocation Plan Defined Lines according to the selected Allocation Rule. The Location Lines represent the most detailed level in the allocation calculation and can be seen as the result on the lowest level.
You can change the Qty. field for each location (or customer). If you change the quantity, the system will place a check mark in the Changed column. To preserve the changes from recalculations, you must select the Locked check box.
You can change the Buffer Qty. field, if you want to use a different ratio between allocated quantity and quantity kept in the warehouse.
To add or delete an Allocation Rule group
You may add or delete an allocation group without making any changes in the Allocation Rule setup:
- Navigate to Allocation Plan Defined Lines, and click the Line menu.
- Select Group Lines to open the Allocation Plan Groups Defined page.
- Insert a Sort Order, Group Code and Buffer Qty., if required.
- Close the page, repeat step 1, and select Destination Lines, this time to open the Alloc. Plan Des. Lines Defined page.
- Create a new line by selecting the Group Code created in step 3. Next, define the Destination Type, Destination Code, and Buffer %, if required.
- Close the Alloc. Plan Des. Lines Defined page.
- Revise or re-enter the value of Group <n> Quantity and the new quantity will be allocated accordingly.
Note: Adding or deleting an allocation group will result in removing the Allocation Rule Code in the Allocation Plan Defined Lines.
See Also